Installing Fedora 29 on Orange Pi Zero

Here are the steps to install Fedora 29 (armhfp) on the Orange PI Zero, from a Fedora 29 desktop. “opz” will be used throughout post to avoid typing “Orange Pi Zero” repeatedly.

Prepare sdcard on desktop

Perform these steps on your Fedora 29 desktop to prepare the sdcard that will be used in the opz.

  • Download Fedora 29 Minimal Image for armv7 from https://arm.fedoraproject.org/
  • Install ARM image tool packages
    sudo dnf install uboot-images-armv7 arm-image-installer
  • Install image to sdcard. Replace “sdX” with location of your sdcard and adjust paths to ssh key and downloaded image as appropriate.
    sudo arm-image-installer --media /dev/sdX --target=orangepi_zero --image=Fedora-Minimal-armhfp-29-1.2-sda.raw.xz --resizefs --addkey=.ssh/id_rsa.pub --relabel

Boot Orange Pi Zero

  • Eject the sdcard from desktop and insert into the opz.
  • Connect RJ45 ethernet to opz.
  • Connect 5V USB power to boot opz.
  • Monitor DHCP server to determine IP address supplied to opz.
  • SSH as root to IP address.

Post boot config

  • Disable firstboot. If you connect to opz via serial connection, you’ll see the console is waiting for you to create a user and/or set root password. The initial-setup service is responsible for this.
    systemctl disable initial-setup
  • Reboot

Your Orange Pi Zero is now running Fedora 29 (Minimal), and can only be accessed by IP address as root with SSH key.

Making a Word Cloud of your #TaskWarrior Tags

Here is a quick way to generate a word cloud of your Task Warrior tags:

[mjs]$ ( echo graph d{ ; task tags | tail -n +4 | awk '{print "\""$1"\"[fontsize="10*sqrt($2)",shape=none];"}'; echo } ) | fdp -Tpng > tag-cloud.png

Note that “fdp” comes from the “graphviz” package, so make sure that is installed first.

Fedora 29 Beta on GPD Pocket 2

#fedora #gpd #pocket2 #linux

Of course, immediately after I get Fedora 28 running on my new Pocket 2, what happens ?  Fedora 29 Beta is released!  So, here are my notes on getting Fedora 29 Beta running on the GPD Pocket 2.

Installing Fedora 29 Beta

  1. Obtain the x86_64 Live ISO and write it to a USB drive
  2. Boot from the USB drive using F12 to access the boot menu
  3. The desktop will begin rotated sideways (just like with Fedora 28), but we can fix this.  Bring up Display Settings and do the following:
    • Select “Orientation” = “Portrait Left”, noting this gives an error
    • Select “Resolution” = 864×1152 (the lowest resolution)
    • Select original resolution of 1200×1920 again. This clears the error and activates the “Apply” button.
    • Click Apply and display should be properly oriented.
  4. Perform the Fedora installation like normal
  5. Reboot
  6. The screen orientation will be sideways again.
  7. Run through initial setup (sideways) to create user account
  8. Once logged in as your new user, use the steps above in item 3 to correct the screen orientation
  9. If you find the font and other UI elements to be too small on this 7″ screen,. then you’ll want to enable fractional scaling. Enter the following at the terminal:
    gsettings set org.gnome.mutter experimental-features "['scale-monitor-framebuffer']"
  10. Log out, log in, and enter the Display Settings again. You should now see an option for “Scale”. I find 150% to be the smallest comfortable on this small screen.
  11. If you want bigger, edit “~/.config/monitors.xml” and set the scale to 2
    <scale>2</scale>
  12. The font can also be scaled up by installing gnome-tweaks, running “Tweaks” and changing “Fonts->Scaling Factor”
  13. Open a terminal, and copy the monitor configuration so that the GDM login screen also has proper orientation and scaling:
    sudo cp ~/.config/monitors.xml /var/lib/gdm/.config/
  14. We can correct the orientation of the text console during boot by modifying a kernel parameter in Grub.
    • Edit /etc/default/grub to modify the GRUB_CMDLINE_LINUX variable, appending “fbcon=rotate:1” to the end
    • grub2-mkconfig -o /boot/efi/EFI/fedora/grub.cfg
  15. Reboot

What’s left ?

  • The plymouth screens during boot are still sideways, including the LUKS password prompt.  There appears to be upstream patches to correct this.

Fedora 28 on the GPD Pocket 2

Update 2019-09-29 10:00 ET: Post initially stated “F7” to enter BIOS.  Corrected to state “DEL” is used to enter BIOS.

Yesterday my GPD Pocket 2 arrived.  So what’s the first thing I had to do with it?  Well, install Fedora 28, of course!  So far, it runs great (I’m typing this blog post on it right now!), but there were a few bugs to work through.

img_20180924_214702
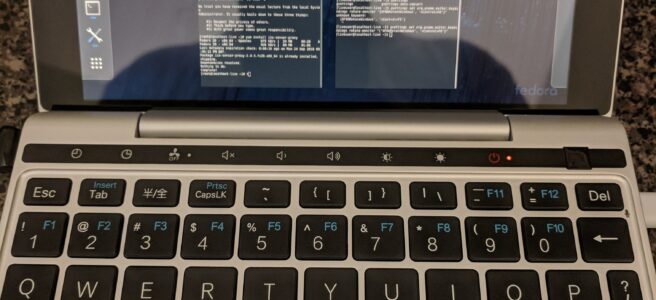
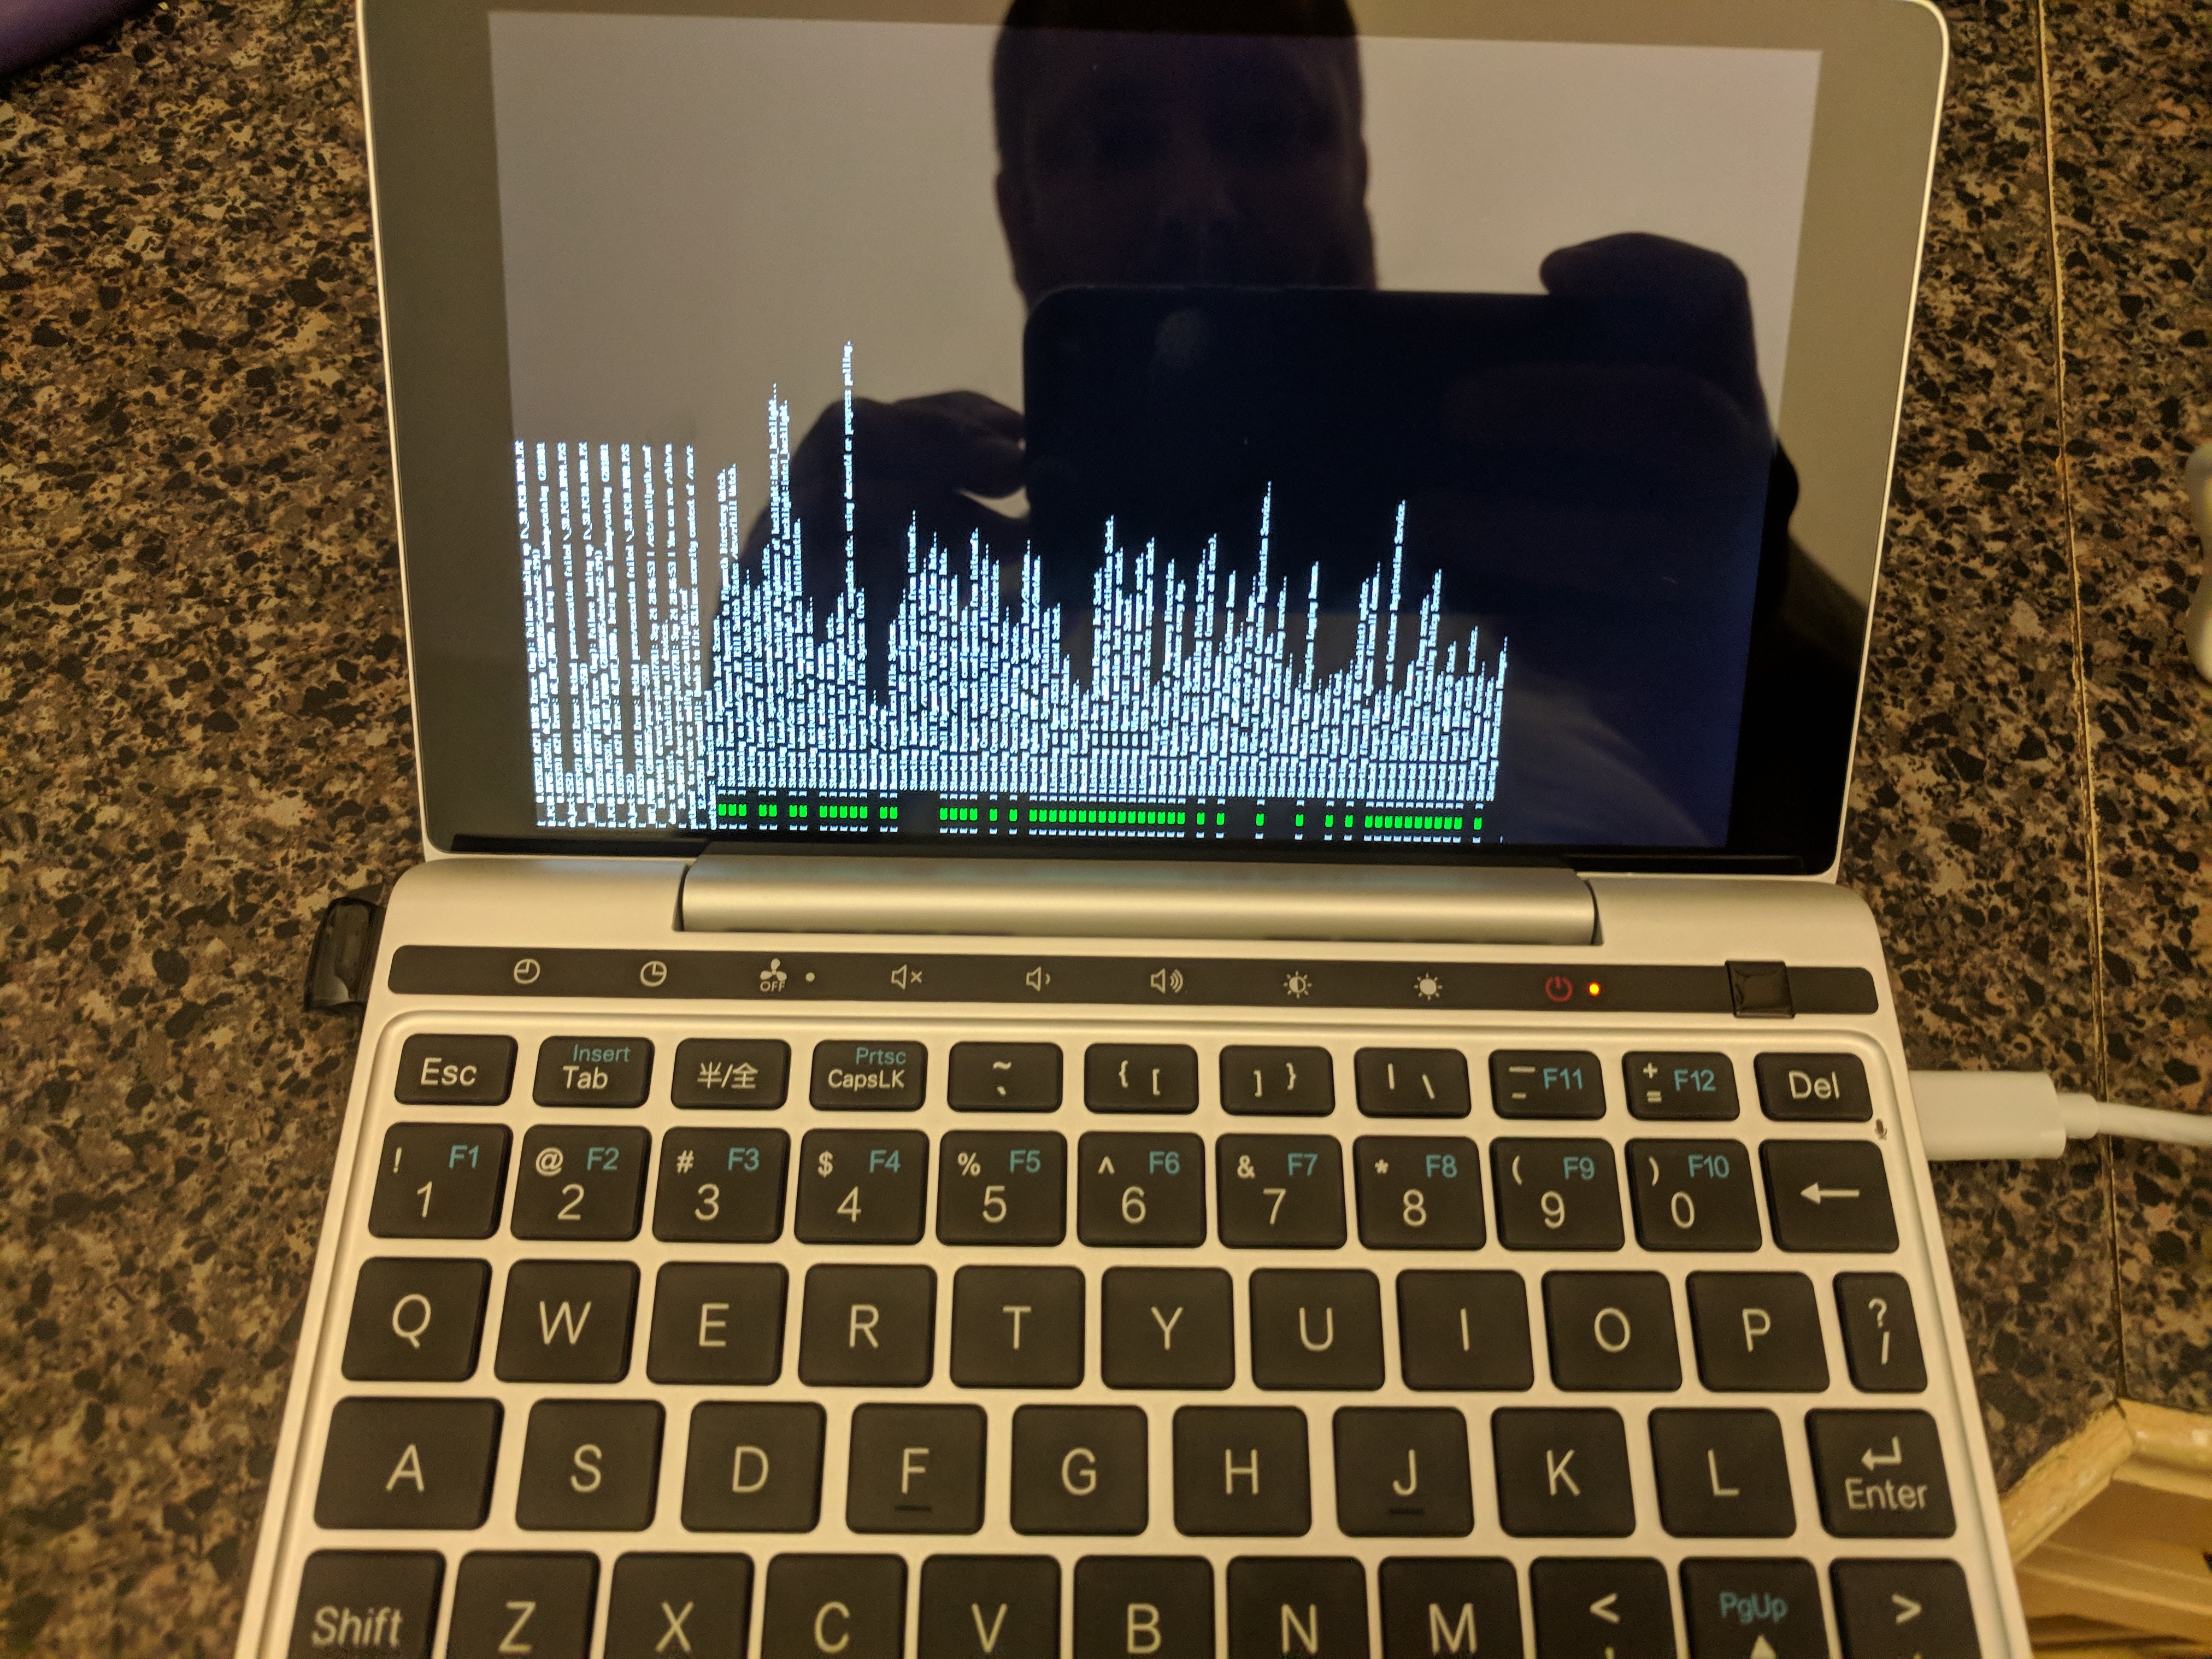
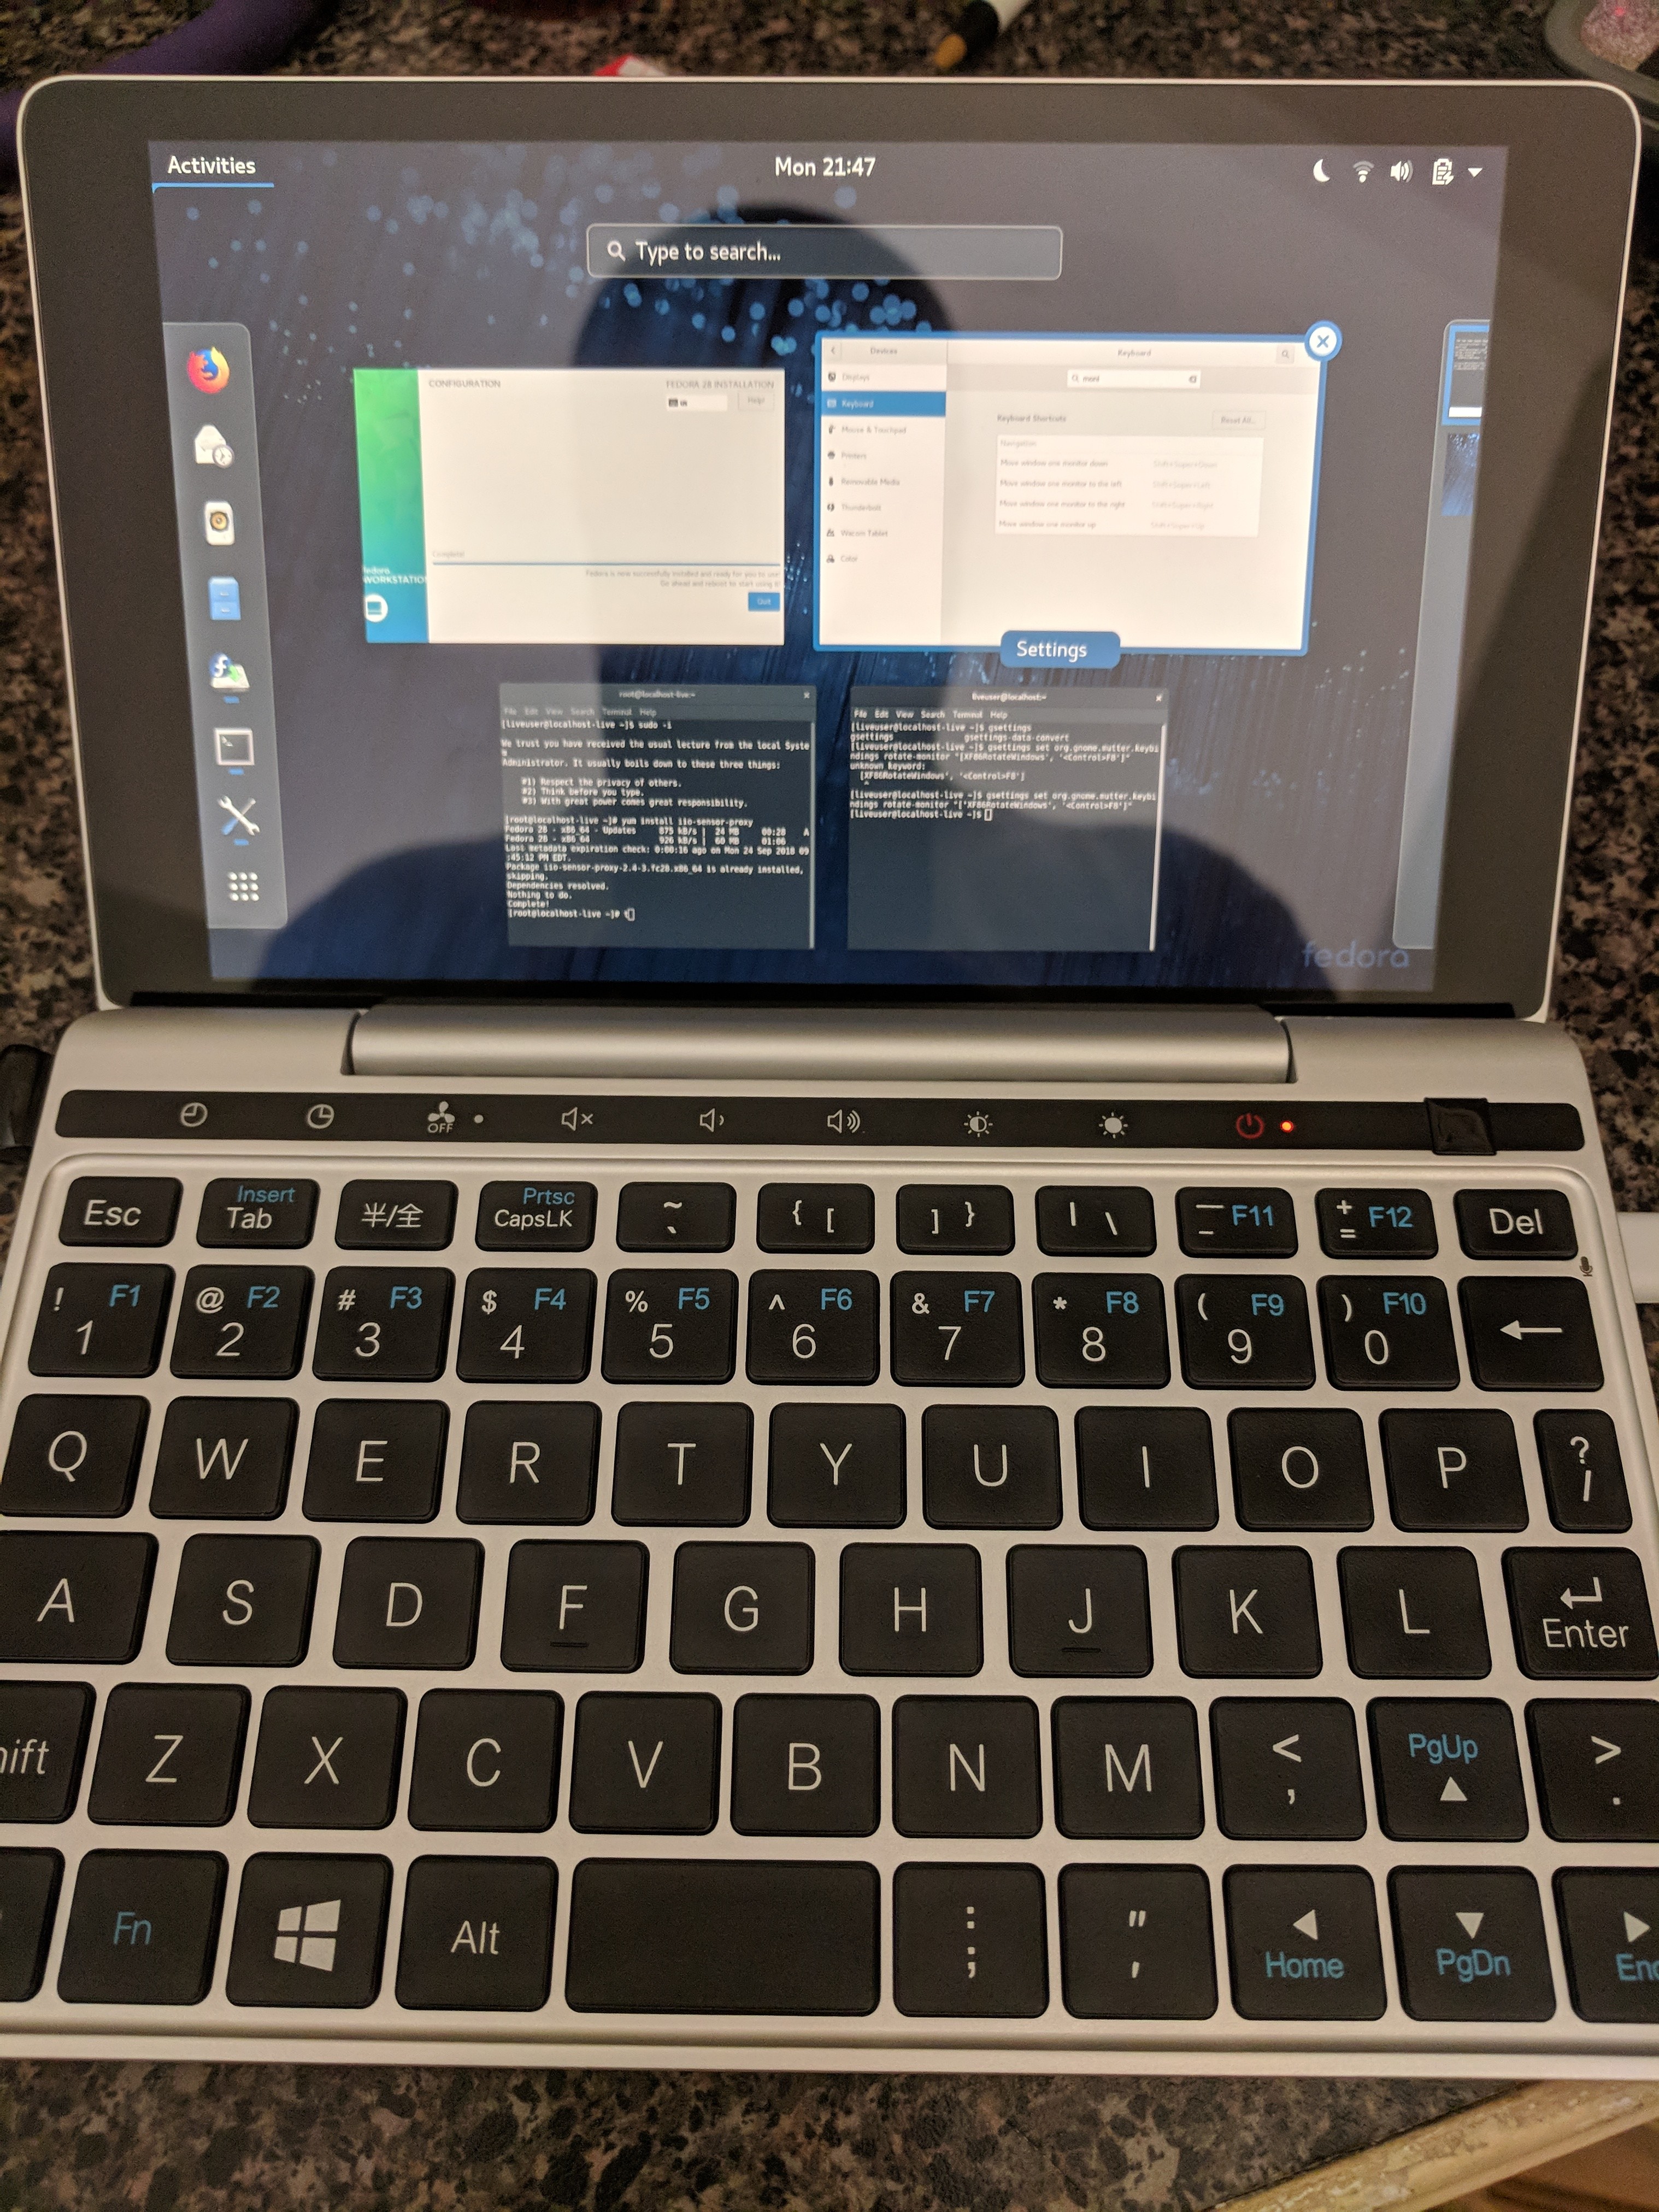
This 7″ UMPC comes with Windows 10 by default, but that was pretty easy to fix.  I grabbed the standard x86_64 Fedora Workstation ISO from https://fedoraproject.org , and wrote it to a USB drive.  When booting the device, F12 (Fn+’=’) will show you a boot menu, and you can boot off the USB. (DEL will get you into the BIOS settings).

Once booting, you will immediately notice everything is sideways – the text boot, the GDM login, and the desktop.  Unless you are comfortable working sideways, we’ll need a temporary fix for the install, and a better fix once installed.

img_20180924_212549

Using the Live Desktop, open a terminal (yes, we are still sideways) and enter the following to bind a hotkey to the “Rotate Screen” Wayland action:

$> gsettings set org.gnome.mutter.keybindings rotate-monitor "['XF86RotateWindows', '<Control>F8']"

Now you can press CTL-F8 (don’t forget to include Fn) to cycle through screen angles until things look right (I had to press 7 times).

Now, go ahead and install Fedora, everything should be normal – until your first boot, when everything is sideways again.

Unfortunately, the “Orientation” option in the Display Settings doesn’t appear to work.  Or at least it didn’t until I tried a very low resolution, and then toggled back to the higher resolution.  To simplify this for anyone reading this blog, just create a file named ~/.config/monitors.xml, and add the following content:

<monitors version="2">
<configuration>
<logicalmonitor>
<x>0</x>
<y>0</y>
<scale>1</scale>
<primary>yes</primary>
<transform>
<rotation>right</rotation>
<flipped>no</flipped>
</transform>
<monitor>
<monitorspec>
<connector>eDP-1</connector>
<vendor>unknown</vendor>
<product>unknown</product>
<serial>unknown</serial>
</monitorspec>
<mode>
<width>1200</width>
<height>1920</height>
<rate>60.022136688232422</rate>
</mode>
</monitor>
</logicalmonitor>
</configuration>
</monitors>

Log out, log in, and your desktop should now be the proper orientation.  If you want to correct the GDM login too (hey, maybe you like it sideways!), simple copy the monitors.xml file into /var/lib/gdm/.config/ and restart GDM (or just reboot).

You will probably also want to use the Gnome Tweak Tool to change the font “scaling factor”, under the “Fonts” section.

Screenshot from 2018-09-25 11-41-42

I have not yet figured out how to properly orient the textual boot console – and this includes the Plymouth LUKS login.  If anyone has any ideas on that, please leave a comment below.

But aside from that one remaining annoyance, so far this looks like it’ll be a great little Fedora device!


Reduced footprint vs minimal footprint

I read quite often about how a minimal operating system, with all things unnecessary for its expected functionality removed, is “more secure” because of the minimal attack surface.  While there is definitely something to be said for reducing the attack surface, having a minimal OS is not necessarily a good security practice.

“But Matt, if I don’t need something, then I should remove it so that an attacker can’t attack it, right?”  Maybe — it depends on how we define “need”.

If you are running a web server, do you need a mail server, or a print server, or a FTP server also running on that same system?  Probably not.  Remove those extraneous services from your deployment.

If you are running a web server, do you need a firewall ?  Well, the firewall doesn’t help you deliver web pages.  But I think many will accept that removing the firewall for the sake of minimality would be silly.  This is the other end of the spectrum, but helps illustrate the point that pure minimalism can actually negatively impact the security posture.

If you are running a web server, do you need a file system integrity monitor (FSIM) or other secondary defenses?  This is where we start getting into a fuzzy area.  I would argue that you should keep security tooling like an FSIM on your server.  The minimal footprint may help reduce the attack surface, but it will never be zero.  An attacker may still find a way in.  And when they do, you need additional layers (like FSIMs, EP, AV, MAC/SELinux, etc) to mitigate their impact and determine what they have done.  Don’t remove these tools from your OS deployment simply because you have a goal of minimally-sized functioning server.

If you are running a web server, do you need tcpdump, performance co-pilot, puppet, zabbix agent, splunk agent, or other operational tooling?  For normal day to day activity, you should never need these tools.  But occasionally, something will break, or something needs to be changed.  You will need tools that let you troubleshoot and fix, or that have been monitoring and collecting data for a period of time.  And if those tools aren’t already installed, you may not be able to install them during a problem.  Have you ever tried troubleshooting a network problem on a system where you can’t run “yum install tcpdump” because of the network problem?  While these tools are not security tools specifically, these are tools that are operationally necessary.  Consider keeping these tools, at least the critical subset of them, in your OS deployment.

If you are running a web server, do you need perl, python, ruby, and other scripting languages installed?  This requires deeper digging – do any of the tools that you’ve identified from the above scenarios require those languages?  Were they written in perl, python, or ruby, or require those languages for extra functionality ?  Tracing these dependencies can lead to a list of software that you may not have initially considered required, but due to choices of tools are not a requirement.  Assess this carefully, balancing your choice of tools against their requirements, but recognize that you may have to include some of these scripting languages, just to avoid creating security and operational impacts as described earlier.

So remember – your security posture cannot simply be measured by how small the OS deployment is.  Removing security tools from your OS can negatively impact your security posture, and removing operational tools from your OS can negatively impact your operational risk.  Before you start taking a scalpel to your OS with a goal of carving down to the smallest possible size, make sure you take into account your security and operational considerations, and the dependencies they pull in.

Using Ansible with OpenWRT

I’ve recently been playing with OpenWRT, and decided to see if I could use Ansible to manage it.  From a basic install of OpenWRT, here is what needs to be done to be able to manage with Ansible:

  • Use the WebUI to upload your SSH public key
  • Install a few packages, either via the WebUI or from the CLI with “opkg install”
    • python-light
    • python-logging
    • python-crypto
  • On your Ansible control node, specify the following in your ansible.cfg (dropbear does not include the sftp subsystem):
    [ssh_connection]
    scp_if_ssh = True
  • Give it a test (output trimmed below for brevity):
    $ ansible -msetup -i [email protected], all
    [email protected] | SUCCESS => {
    "ansible_facts": {
      ...
      "ansible_architecture": "mips",
      ...
      "ansible_distribution": "LEDE",
      "ansible_distribution_version": "17.01.4, Reboot",
      ...
      "ansible_os_family": "LEDE",
      "ansible_pkg_mgr": "opkg",
      ...
      }
    }


A personal mobile LAN

I’ve found myself with a lot of nerve-wracking thumb-twiddling time in the hospital over the past few weeks. So, needing to secure my internet access across an open public WiFi and needing a project to distract myself a bit, I decided I wanted a device or collection of devices that perform the following roles:

– a WAP that I can use to connect my laptop, my tablet, my family’s Android tablets, my phone and my ChromeCast or Roku.

– selectable uplink via a WiFi repeater to an existing WiFi network, 3G/4G, or Ethernet

– a firewall between my devices and the uplink

– a NAS/DLNA server with enough storage to hold several full-length movies, streamable to the family’s Android tablets

– site-to-site VPN to my home network

And, I want this all to be portable, and ideally have some battery capability for travel.

This isn’t too much to ask, is it? Incredibly enough, I’ve got this working, quite well.

I found the GL-MiFi from GL.iNet, with the AT&T 4G module (Amazon). This device runs OpenWRT (a small Linux distro optimized for embedded devices, especially good for small personal/home routers). This provides a great WAP, with a solid firewall (iptables), all manageable from the rather nice OpenWRT Luci GUI, or from the simplified GL.iNet web UI, or via SSH (yes, I’ll figure out some nifty Ansible sometime in the future). And, this device packs a 5000mAH battery for several hours of disconnected use.

I added a data-only SIM from Google’s Project Fi. I have already moved my cell service to Fi, so this additional data-only SIM cost nothing, and just consumes from my existing data package. Since the MiFi takes micro SIM, and Project Fi ships a nano SIM, I also needed to throw in a SIM card adapter (Amazon). So now I have uplink via Ethernet (the MiFi has both a WAN and LAN port), WiFi (the MiFi can act as a wireless repeater), or via 3G/4G.

I’ve also added two storage devices – a 128GB SanDisk Micro SD Card Amazon) and a 128GB SanDisk USB 3.0 drive (Amazon). Why two? Well, I happened to have both already on hand, and the MiFi provides both a Micro SD slot and a USB 2.0 port, so why not try both? Once formatted ext4, they immediately show up in the web UI, and can be accessed via SMB/CIFS. And, by adding the minidlna package in the OpenWRT software management interface, VLC on the Android tablets immediately discovers and can stream any video or audio content on the storage!!

The only remaining requirement is the site-to-site VPN. I haven’t actually figured this out yet, but – given that I’m running a Ubiquiti USG in front of my home network, it looks like I’ll be able to accomplish this either via L2TP/IPSec or via OpenVPN. I’ll make sure to write that up once I figure it out.

Ansible quirks: Delegating a task with a unique remote user

I’ve spent a few hours banging my head against something that – in retrospect – is pretty obvious: “delegate_to” does not respect the “ansible_user” inventory variable.

Challenge

delegate_to is used to execute a task on a host other than the one targeted for playbook execution.  Compare these three tasks:

- command: echo Hello World

- command: echo Hello World
  delegate_to: localhost

- command: echo Hello World
  delegate_to: random.example.com

The first task will execute “echo Hello World” on the system in the inventory that this playbook is being called for.

The second task will simply execute the ‘echo’ on the system running the ansible playbook.

The third task will connect to “random.example.com” to execute the echo.  But, notably, “random.example.com” doesn’t even need to be in your inventory, and so the connection to “random.example.com” does not use any inventory variables, such as “ansible_user”.

“delegate_to” will respect the global “remote_user”, but I often use different non-root user accounts for Ansible connections.  So, if “delegate_to” doesn’t respect “ansible_user”, and if I can’t set a useful global “remote_user”, what can I do?

Solution

Once I figured this out, it’s pretty obvious in hindsight:

- command: echo Hello World
  delegate_to: my_remote_user@random.example.com

“delegate_to” allows the user to be part of the connection string.  In this example, I will connect to ‘random.example.com’ as the ‘my_remote_user’ id.  This could also be replaced with an inventory variable for the host the playbook is run for.

How to approach KPTI remediation

If you are in I.T., you’ve heard about Meltdown and Spectre by now.  So – what are you going to do about it?

  1. Don’t panic, follow your existing High Priority Security Patching processes.
  2. Start assessing, in your test environment, the performance impact of patches against your performance-sensitive workloads, especially those with heavy disk I/O or network I/O. (Red Hat customers – check out our assessment of performance impacts using our patches).  Make sure you are aware of the new “nopti” kernel parameter, but be *very* judicious in it’s use.
  3. Prioritize multi-user systems, especially if any potential users are not trusted.
  4. Prioritize patching of shared compute resources, such as public or private clouds, especially where the host is carrying workloads (applications, VMs) from multiple security or compliance domains.
  5. This is not (yet) known to be remotely exploitable, so systems that are not sharing resources and are not accessed by multiple users can have a slightly lesser priority.  Given the performance impact referenced in #2 above, and given that performance-sensitive workloads are often run isolated from other workloads, balance an appropriate amount of time in testing the impact of the patches to your workload.


So, don’t panic, follow process, understand the impact to your environment – just like you should in any security event.